Mediterranean Veggies with Basil Chicken

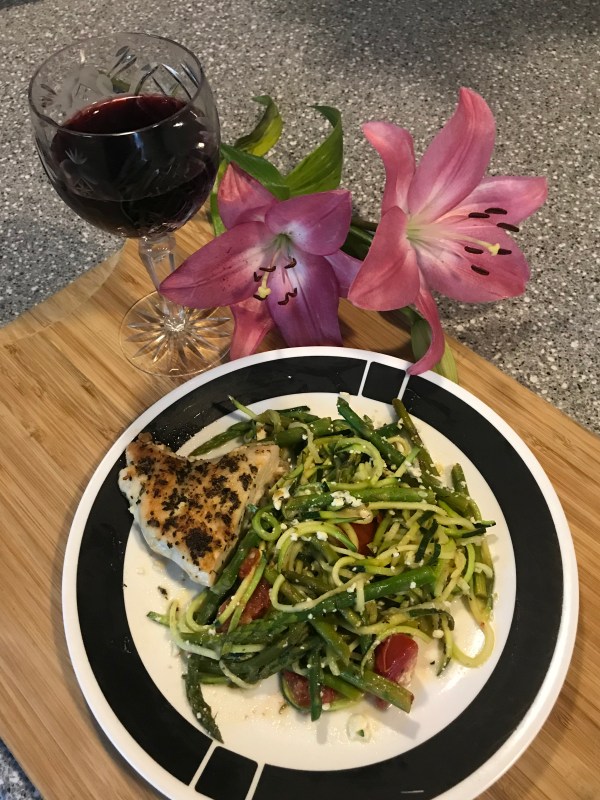
I was inspired to make this colorful and light veggie dish after having something similar at an organic café in Minneapolis. It was so easy to recreate and pairs wonderfully with a variety of proteins – chicken, shrimp, fish, garbanzo beans – or just by itself. I’ll describe how I made the chicken, but feel free to leave it out or substitute your favorite protein.

You’ll need:

• 2 chicken breasts, tenderized (i.e. pounded flat with a meat hammer)
• 2 Roma tomatoes, cut into 1/8’s
• 1 bunch asparagus, cut in 1/2’s or 1/3’s
• 2 zucchini, spiralized into zoodles
• Feta cheese, to taste
• Butter or ghee
• Garlic, 2 minced cloves or 1 heaping tablespoon of pre-minced
• 1/4 cup water

Use to taste for both the chicken and the veggies:

• Dried basil
• Dried oregano
• Onion powder
• Salt and pepper
• Cooking oil

Directions:

1. Cook the chicken first. First, pound it nice and flat, then season the top with basil, oregano, onion powder, and salt and pepper. Heat cooking oil in a pan on medium heat, and place chicken into the pan. Let it cook halfway through, then flip it to sear the top side.

2. Once seared, flip the chicken back over, add a tablespoon or butter or ghee to the pan, and baste the chicken. Test for an internal temp of 165, and set aside to rest when done or very close to that temperature.

3. Heat oil in a stir fry pan, and sauté garlic. Once fragrant, add asparagus. Add 1/4 cup water to the pan, then cover and steam asparagus for 2-3 minutes.

4. Add in the zoodles and tomatoes, heating through until zoodles are at desired tenderness. While they are cooking, add in 2 tablespoons of butter/ghee, mixing with the garlic and natural vegetable juices to form your sauce.

5. Add in all seasonings to your preference.

6. Sprinkle feta cheese on top and let heat just briefly before serving with the chicken.

Cheesy Broc-Cauli Rice with Bacon

Get ready- I’m about to up your veggie game in the most delicious way! This dish can be served as a side or eaten as a complete meal. It has all the requirements – protein, multiple servings of vegetables, healthy fat, and spice!

I’ve talked before about making cauliflower rice. You’ll want to do that again here, and also rice up broccoli in the same way. We tried this at home once, and now, that’s all we do. I call it “Broc-cauli rice.” Make it in bulk and store it flat in the freezer. When you’re ready to cook, just thaw for a couple minutes in cool water so you can easily get it out of the bag.

Ingredients:

Avocado oil – enough to coat the bottom of the pan
Garlic – 2 cloves or a teaspoon, chopped
Broccoli – 1 head, riced
Cauliflower – 1 head, riced
Salt and pepper, to taste
Cheddar cheese – 1 cup
Cream cheese – 1 ounce
Jalapeño slices – 10-15, chopped
Red pepper flakes, to taste
Bacon – 5 slices (1/2 pound), chopped

Instructions:

  1. Heat a large pan and add avocado oil. Sauté garlic until fragrant.
  2. Add broc-cauli rice, mixing in garlic. Sprinkle in salt and pepper. Once heated through, broc-cauli rice will begin to soften.
  3. Add cheddar cheese and cream cheese, stir until melted and incorporated throughout.
  4. Mix in jalapeños, red pepper flakes, and bacon.
  5. You know what to do next.


Shock Guac

In case you’ve been living under a rock, I need to alert you to the wonders of the avocado. Rather boring looking from the outside, the avocado contains a bright green “healthy fat” that can take a dish from ZZZZ to yippee! I admit, I’m dorking out on avocado, but it’s SO good. I even use it in place of a banana in my smoothie sometimes, which creates a silky texture more suitable for a spoon than a straw.

Anyway, my 4 year old could make regular guacamole, but this one is NOT for her tiny tastebuds. I debated on whether to call this Guaca-holy moly, but ended up with the even classier title. The credit for this recipe goes to my husband, but the name was all me. 🙂

2 ripe avocados, mashed
4 t lime juice
10-12 jalapeño slices, chopped
1/2 t onion powder
2-3 t crushed red pepper
3 pinches salt
2 pinches pepper

Stir it all together until well blended. Eat on top of basically anything, including roasted sweet potatoes, eggs, rice, or alone with chips or veggies.


Asian-inspired Salmon with Stir-fried Vegetables

For the Salmon:
Salmon fillets
Salt and pepper
Oil
1 T Butter

For the veggies:
Bell peppers, thinly sliced
Zucchini, cut into small sticks
1T Sesame oil
2 T Stir fry oil
Salt and pepper
Mongolian fire oil, if desired

For the sauce:
1 T Pad Thai sauce seasoning packet
1/2 C water
2 T Soy sauce or liquid aminos

Other:
Rice or grains of some sort

I was so grumpy the other day. Just ask my husband. Super grumpy. I knew I needed to do something to get my head on straight, and what better than a super delicious supper (paired with a vodka tonic)? I stopped at a fresh seafood place on my way home (Yes, we have these in South Dakota…okay, we have ONE, but it’s good!) and picked up a few fillets of Atlantic salmon with the skin on.

I had a few colorful bell peppers and zucchini in the fridge and decided to slice those up in a different way, making them long and thin. You could really use whatever vegetables you want. I just love the bright colors of bell peppers.

Directions:

1. Sauté your choice of veggies in cooking oil (I use a mediterranean blend) until they are not crisp but not mushy, adding a little sesame oil, stir fry oil if you have it, salt, and pepper while they cook. To spice it up, add some Mongolian fire oil or other hot oil. Once the veggies are cooked, move on to the salmon. (It’s expensive, so I always make an effort to not do anything else when I’m cooking it, which is very hard for a scatterbrain like me).

2. Sprinkle the salmon with salt and pepper, then prepare to cook it. (I used a nonstick copper pan, got it nice and hot, drizzled some oil in, and got that nice and hot too so the salmon skin would sear when I placed it in.)

3. Let the salmon cook skin side down for the majority of the cook time. (I can’t tell you how long that is, since it really depends on the thickness of your fillet, but somewhere between 3-7 minutes.)

4. While the salmon is cooking, add some butter into the pan and baste the salmon with the melted butter. Flip the salmon when it is getting close to cooked through so you can get a nice gentle sear on the top where you’ve been basting it. (Sometimes I do this too soon and have to flip it back over.)

5. Set salmon aside to rest, then make the sauce.

6. Any sort of Asian-inspired sauce would work, but I used a tablespoon of pad Thai seasoning, simmered with water and liquid aminos until it thickened into more of a glaze.

7. I had a package of seven grain something or another from Costco, so I threw that in the microwave.

8. Plate it all up and enjoy!

Chocolate Power Balls

I’m no dietician, but I try to eat healthy. It’s hard because I have a major sweet tooth, and chocolate is a required part of my daily diet. Don’t argue with me. I need it to survive, I swear.

So, I set out to make a tasty chocolatey snack packed with as much good stuff as possible. I’m not saying they’re truffles (they’re NOT), but they hit the spot for me and are much more satisfying than a candy bar. I can even eat 2-3 of these for lunch and not be ready to eat my arm off at the end of the day. That’s saying a lot.

Chocolate Power Balls Recipe:

2 C old fashioned oats (uncooked)
4t chia seeds
3t dried spinach powder
3T cacao (not cocoa) powder
2 scoops protein powder (vanilla or chocolate)
1/4 C almond butter
1T agave syrup or honey
2T coconut oil (melted)
Dark chocolate chips (either mini or chopped big ones)

Using a food processor or blender, blend oats into a course flour. Mix in chia, spinach, cacao, and protein powder. Add all other ingredients except chocolate chips and blend well. Add chocolate chips at the end and mix gently. Make into balls/domes using cookie dough scoop. Makes 15 balls. Store in refrigerator.

Tips:

  • If you want to make these more indulgent, you have to sacrifice some of the healthy stuff. Cut back on the dried spinach powder a little, and replace almond butter and coconut oil with 1/2 cup peanut butter.
  • Check your teeth! Chia seeds expand and can be pretty sneaky, so scope yourself out before smiling at people.
  • Dried spinach powder is pretty great. You can order it online and sneak it into any protein ball, smoothie, or sauce. It smells terrible, but flavor-wise, it seems to blend in really well when you add it to things, just changes the color a bit.
  • Cacao (ka-kow) powder has lots of antioxidants and minerals and a deep chocolate flavor. It comes from the cacao bean, just like cocoa powder, but it is cold-pressed and unroasted, while cocoa powder is roasted at high temperatures. The cacao way of preparation means it is less processed and apparently healthier (again, not a dietician). I frankly think it tastes way better. Order it online unless you have a great health food store nearby.

Pork Chili Verde

Winter has finally caught up with us here in South Dakota. I would say we’re lucky it took so long, but it’s hard to feel grateful for good weather after Thanksgiving if you understand climate change. After you ponder that for a minute, take a deep breath, then cheer up with a comforting bowl of soup.

Pork Chili Verde is a product of my husband smoking a giant pork loin and creating too many leftovers. I tried to get creative. While you can certainly pair a nice pork loin sandwich with some roasted sweet potatoes, that can only last for a meal or two. Then it’s time to spice it up.

This recipe is between a soup and a chili, really. It’s broth-based, but the creamed corn and “green sauce” give it a thicker consistency, and if you garnish with sour cream (you should), I think you have to call it a chili.

Pork Chili Verde

2 cups (or more) diced pork loin (smoked, or just cooked in some way)
2 diced bell peppers – one green, one colored
1 can creamed corn
1 can Great Northern beans
1 cup “green sauce” (your choice of salsa verde, green enchilada sauce, green taco sauce)
32 oz chicken broth
Salt and pepper
1 T Cumin
1 T onion powder (or you can use actual sautéed onion)
1/2 tsp Cayenne pepper (or more, to taste)

Throw everything into a pot and simmer for 2 hours or until bell peppers are soft. (Or throw in crock pot on low for 4 hours).

Garnish with sour cream and tortilla strips/chips.


Easy Roasted Sweet Potatoes for Lunch

I never liked sweet potatoes growing up. They were weird and mushy, and people would always try to cloak them in marshmallows. I wasn’t going to fall for it. Then one day, I met the rustic, vibrant, self-assured tuber that is the roasted sweet potato. Allow me to introduce you as well.

How to make them:

Preheat over to 425.

Peel, then dice 2-3 sweet potatoes into relatively similarly-sized pieces*.

Put potatoes on oiled cookie sheet.

Drizzle or spray oil over potatoes.

Add salt and pepper.

Mix by hand until evenly coated.

Roast in oven for 20-30 minutes or until fork tender and slightly browned.

*If you scrub the skin well, you don’t have to peel them, but most people prefer them without skin.

Once you have roasted the sweet potatoes, your options are endless. They last a week in the fridge and can be reheated as a simple side. They also add great body to chili (recipe to come). One of my favorite combinations, though, is roasted sweet potato and a runny egg yolk. Mmmmmm. So good. So healthy.

Want to add a little extra? Roast up some diced bell pepper with the sweet potato. Add avocado on top of the egg. Use some hot sauce.

Lunch is served.

Simple Spaghetti Squash Taco Bake

Meet my friend spaghetti squash. She’s easy to get along with and a very good influence. She should be your friend too. Ok, I’m going to drop this metaphor now that I am going to tell you how to bake her in the oven. First, preheat to 400 degrees.

Warning! If you have knives in need of sharpening (like mine), you will want to pop your squash into the microwave for a minute or two. This will soften the rind just enough to eliminate the chances of accidentally stabbing yourself. Then cut it in half the long way (“hotdog,” not “hamburger” as my kids would say). Scoop out all the seeds and slimy stuff in the middle, leaving the “spaghetti” flesh intact.

Grab a rimmed cookie sheet (a.k.a. jellyroll pan) and add a little water to it. Place the spaghetti squash cut side down onto the water. Bake in the oven for 20-30 minutes. (Meanwhile, start your taco meat.)

I have read several spaghetti squash recipes that say to cook it for 45 minutes. It has never taken mine that long, and you do NOT want to overcook it or it will be mushy and watery, so I tend to check it after 20 minutes and go from there. If you can easily stab a fork into it, and especially if you can squeeze the rind (USE POTHOLDERS!) to make the flesh pop out, it’s done. Scrape all the spaghetti out with a fork, then sprinkle it with salt to hold in the moisture and give it some good flavor.

Please note, this recipe is incredibly simple, but it can be time-consuming. If you make the spaghetti squash and/or taco meat ahead of time, this becomes a quick weeknight success. You’ll notice my family liked it so much, I only got a photo of half of it!

Ingredients:
Spaghetti squash, prepared
1 pound taco meat, prepared
Diced bell peppers
4 oz. cream cheese
Shredded cheese to preference
S&P to taste
Sour cream, avocado, salsa, crushed tortilla chips (optional garnishes)

Quick directions: Bake at 400 degrees for 25-30 minutes.

Directions:
1. Prepare a 9×13 casserole pan with your choice of nonstick medium, then spread the prepared spaghetti squash on the bottom of the pan. Sprinkle with salt and pepper.
2. Melt the 4 oz (half a block) of cream cheese into your prepared taco meat.
3. Add diced bell peppers to the taco meat. Mix well.
4. Spread taco meat mixture on top of spaghetti squash.
5. Top with shredded cheese to your preference.
6. Bake uncovered at 400 degrees for 25-30 minutes.
7. Garnish with sour cream, avocado, salsa, tortilla chips, etc. Enjoy!

Mexi-Cauli One Pan

I don’t know, you guys. I think it’s impossible to make a bowl of ground turkey and cauliflower rice look appetizing. I tried my best, but you might just have to take my word for it. It’s delicious.

I am a huge fan of cauliflower rice. You can prep a ton of it ahead of time, and it is super easy to cook in a hurry. It adds body to any recipe, and takes on the flavor of whatever you cook it with. My favorite is to throw it into Mexican cuisine.

This particular dish is extremely versatile. I actually don’t know if what I’m writing here and what is in this picture are exactly the same because I’ve made it 100 different ways. This recipe is a good starting point, but feel free to get creative with whatever you have handy.

Ingredients:
– 1 pound taco meat, whatever that means to you.
– 1-2 cups sliced or chopped peppers – any color bell pepper, serrano, and/or jalapeño, as preferred.
– 1 can corn
– 3 cups cauliflower rice
– 1 cup salsa (or 3/4 cup enchilada sauce or 1/4 cup adobo sauce)
– 3 oz (or 1/3 of brick) cream cheese
– Optional garnishes: Avocado, tomatoes, lettuce, tortilla strips/chips, lime wedge

Directions:

1. Cook up some taco meat. I personally use ground turkey, but I know others prefer hamburger. You do you. (If you don’t have a prepared taco seasoning on hand, combine: cumin, chili powder, garlic powder, onion powder, salt, and pepper instead.)
2. Add in peppers. I typically have bell peppers of some color on hand, but you could easily use Serrano peppers and even some jalapeños if you want some kick.
3. Add in corn.
4. Once your peppers get tender, add in the cauliflower rice, mix, and cook all of it together.
5. Next, add in 3 or so ounces of cream cheese.  Melt down and stir in well.
6. Stir in 1 cup of salsa (other options: 3/4 cup red or green enchilada sauce or 1/4 cup adobo sauce – dice up some of the chipotle peppers it usually comes with as well).
7. Serve alone or garnish with tomatoes, avocado, lettuce, a squeeze of lime, and/or tortilla strips.

To Make the Cauliflower Rice:
If you want to prep it ahead of time, go ahead and grab a few heads of cauliflower. Cut it into florets and wash it. Once you’ve got your clean cauliflower florets, it’s time to rice them. I have a super cool contraption that does it in like two seconds, but I don’t get paid to advertise for them, so I’m not telling you what it is. 🙂 Feel free to use your own super cool contraption, or a food processor or blender. (If you are ricing by hand with a cheese grater, I’m really sorry, but I bet your forearms will look amazing.)
Bag up 3 cups at a time and freeze flat. When you’re ready to use it, just dump it directly into a pan to steam. It takes maybe five minutes to cook. (Side note: when using with a curry dish, cook it with a few tablespoons of canned coconut milk – the thick part. Mmmm…)

Bonus Tip: Washing Cauliflower
Let’s talk about washing fruits and vegetables for a second. It’s a pain, am I right? Here’s a tip: Fill up your salad spinner with water and add 1 cup of vinegar (white or apple cider). Soak your veggies and fruit in there, then pull out the colander part and rinse them in there. And yes, I said VINEGAR. It’s a fantastic natural cleaner, and I promise it will not make everything taste like sauerkraut.

Blueberry Maple Overnight Oats

I have such a love/hate thing going on with breakfast. I mean, DONUTS. Need I say more? Can’t live without ‘em…can’t eat ‘em everyday. So, what are we to do the other 6 days of the week when we are scrambling out the door with one shoe on and half-dried hair feeling lucky that the office supplies semi-drinkable coffee? That’s where these beauties come in. I prep a whole batch of mason jar oats on a Sunday, and the hubby and I are both set for the week (leaving Friday open for donuts, of course.)

There are countless ways to make overnight oats, so feel free to sub things out and get creative. This is what I have found to be easy for me to make, packs my morning with protein, and tastes good enough to make me want to eat it 4 days a week.

First, the oats – so controversial. Seriously, why so much drama with the oats? Anyway, there are some great articles out there about how you can soak them overnight to make them easier to digest, and there is plenty of debate about whether to go with old fashioned, steel cut, organic, or some other type of grain or grain substitute. I’m just trying to make your morning a little easier, so I will skip the oat essay. Most recently, I happened to use steel cut oats I bought in bulk. And this batch, I didn’t soak overnight, but sometimes I do. Either way, you still end up cooking them according to the package directions, then add pure maple syrup and some cinnamon.

Now, the “goop.” I will try to figure out how to add another photo into this blog so you can see my layers, but the goop is key.  The base of the goop is plain Greek yogurt. In my opinion, the higher fat content, the better it tastes. Mix up your favorite vanilla protein powder with some almond milk (or regular milk if you prefer), then mix that into the yogurt. Don’t mix the protein powder directly into the yogurt. It will feel like you are eating sand. No one likes that. Dump the goop over the oats. Sounds appetizing, right? Just trust me on this.

Last, the toppings. Chopped walnuts are an awesome addition nutrition and flavor-wise. Fruit is a must to add more sweetness and flavor. I used to always do fresh blueberries, but one day I ran out and threw some frozen mixed berries in there, and it actually worked better! Now I use either frozen mixed berries or frozen blueberries. The mixed ones are more flavorful, but the plain blueberries make it this gorgeous purple color when you mix it up. And starting your morning by eating something purple is just kind of magical.

Recipe (8 servings):

The oats:

4 C oats, prepared – Add 1/2 C in bottom of small mason jar

1/4 C pure maple syrup – mix into prepared oats

Also add cinnamon, to taste.

The “goop”:

2 C plain Greek yogurt (the fatter, the better)

1 scoop vanilla protein powder mixed into 1 cup almond (or regular) milk until dissolved.

Mix the yogurt with the milk mixture.

Put 1/4 C “goop” over the oats in each jar.

Toppings:

Add chopped walnuts, if desired, to each jar.

Add fresh fruit right away or frozen fruit the morning of.

When you’re ready for breakfast, mix it all up together and eat cold.


Blog at WordPress.com.

Up ↑